使用 Laravel Zero 创建 TCP 服务器

几周前,我开始为我的团队 “Securets ISI” 主办的即将到来的年度 CTF 开发 TCP 服务器。目标是使玩家能够使用以下命令快速提交标志:
echo "flag" | nc 127.0.0.1 8000对于这项任务,我需要开发一个控制台应用程序。我发现 Laravel Zero 非常适合,而不是去单独拉取像 Laravel 的 DB 和 Views 组件、Symfony 的控制台组件以及用于 DB 迁移的 Phinx 那样的扩展包。我们将使用它来构建服务器!
Laravel Zero 是一个轻量级、模块化的微框架,用于开发快速而强大的控制台应用程序。建立在 Laravel 组件之上。
服务器相关
如果你不了解 TCP 服务器是什么,不用担心,你一辈子都在使用它。Web 服务器是 TCP 服务器,只是有一层抽象。这台在稍低的水平上运行。服务器将将“服务器 socket,socket 是绑定到指定端口的 IP,表示为IP:PORT。该 socket 等待客户端发出请求。因此,每个通信都涉及两个 socket;一个用于服务器,一个用于客户端。
当连接到服务器时,客户端接收由操作系统动态分配的随机端口。是的,单个服务器 socket 可以处理多个客户端,但不能同时处理。每次客户端连接时,都会将其推送到接受队列,等待它的轮次。
创建服务器
事不宜迟,让我们从安装 Laravel Zero 开始:
composer create-project --prefer-dist laravel-zero/laravel-zero securinets现在,你可以将应用程序重命名为对你有意义的名称:
php application app:rename securinets接下来,我希望能够使用环境变量。我用程序需要数据库,我还需要 Blade 引擎。Laravel Zero 使安装这些组件变得简单:
php securinets app:install dotenv
php securinets app:install database
php securinets app:install view
我们可以通过运行以下程序开始使用控制台应用程序:
php securinets [command]对于我们的案例,我们需要构建一个TCP服务器,主动监听传入的连接。我们有几个选择,比如 RoadRunner 或 Swoole,我选择后者。
Swoole 是一个 PHP 扩展,它使你能够做很多事情,例如异步编程、事件循环、协程等等。
对于 Linux,安装非常简单:
sudo apt update && sudo apt install -y php8.2-openswoole我使用的是 PHP 8.2,你可以根据情况自己调整版本。
对于 VSCode 用户,你可以通过安装以下软件包来辅助 IDE:
composer require openswoole/ide-helper然后,在 settings.json:
"intelephense.environment.includePaths": [
    "vendor/openswoole/ide-helper"
],
现在,我们使用 Laravel Zero 去生成一个新命令,以启动服务器:
php securinets make:command ServeCommand在 ServeCommand 中,我们可以使用 Swoole。它提供了 Server 类,它期望一个 host 和一个 port。好消息是,你仍然可以定义环境变量并在配置中引用它们,就像在 Laravel 应用中一样。所有这些都由 Laravel Zero 处理,因为正如你可能还记得的,我们使用 app:install 命令安装了这些组件,否则您必须手动执行。
我很欣赏 Laravel serve 命令日志的组织方式,所以也许我们可以创建类似的东西?我知道 Laravel 通过将 echo 语句与 str_repeat 相结合来构建日志,这一切都是在命令本身中完成的。然而,我发现这种方法有点嘈杂。因此,让我们利用 Blade 引擎来获得更清洁的解决方案。
在resources/views 中,创建一个 log.blade.php 视图
<div class="flex">
    <span class="mr-1 ml-2 text-gray-600">{{ $date }}</span>
    <span class="mr-1">{{ $hour }}</span>
    <span class="mr-1 font-bold">[{{ $client }}]</span>
    <span class="mr-2 text-gray-600">
        {{ str_repeat('.', max(\Termwind\terminal()->width() - 80 - mb_strlen($client), 0)) }}
    </span>
    <span @class([
        'px-1 font-bold',
        'text-red' => !$connected,
        'text-green' => $connected,
    ])">{{ $connected ? 'CONNECTED' : 'DISCONNECTED' }}</span>
</div>
这就是我们将在日志中看到的内容。现在,对于我们将发送给客户的回复,我们希望他们也很冷静。因此,创建一个 response.blade.php。
<div class="py-1 ml-2">
    <div @class([
        'px-1 text-white',
        'bg-red' => !$correct,
        'bg-green-600' => $correct,
    ])>
        {{ $correct ? 'SUCCESS' : 'ERROR' }}
    </div>
    <span class="ml-1">
        {{ $message }}
    </span>
</div>
现在我们的视图已经准备好了,你可能会想,“这不是 Tailwind CSS 吗?”嗯,是的,是的!Laravel Zero 附带了 Termwind,这是另一个很棒的包,使你能够将 Tailwind CSS 类用于控制台应用程序。
现在,我们可以使用 Swoole。但在此之前,让我们复习一下基础知识。要创建服务器,你需要实例化 OpenSwoole\Server 类。通过这样做,你可以连接到各种事件中。我们将使用Start、Connect、Receive 和 Close。你可以在这里找到所有的活动。
Swoole 在底层运行时间循环。事件循环使 Nginx 具有革命性,是 C10k 问题的解决方案。
现在,根据我们所学到的内容,命令将如下所示(对代码进行了注释)
<?php

namespace App\Commands;

use OpenSwoole\Server;
use Termwind\HtmlRenderer;
use LaravelZero\Framework\Commands\Command;

use function Termwind\render;

class ServeCommand extends Command
{
    private string $host;

    private int $port;

    public function __construct()
    {
        parent::__construct();

        $this->host = config('server.host', '127.0.0.1');
        $this->port = config('server.port', 9001);
    }

    /**
     * The signature of the command.
     *
     * @var string
     */
    protected $signature = 'serve';

    /**
     * The description of the command.
     *
     * @var string
     */
    protected $description = 'Start the flag submission server.';

    public function handle(): mixed
    {
        // Create a server object
        $server = new Server($this->host, $this->port);

        // Hook into the Start event
        $server->on('Start', function () {
            /** @var \Illuminate\Contracts\Support\Renderable $render */
            $render = view('start', [
                'host' => $this->host,
                'port' => $this->port,
            ]);

            // Yes, you can use the Blade engine to return the HTML as a rendered string,
            // which can then be rendered by Termwind
            render($render->render());
        });

        $server->on('Connect', function (Server $server, int $fd) {
            $this->log($server->getClientInfo($fd), true);
        });

        $server->on('Receive', function (Server $server, int $fd, int $reactor_id, string $data) {
            // I am only simulating the response; you should execute the business logic.
            $response = view('response', [
                'message' => 'Correct submission, keep it up.',
                'correct' => true,
            ])->render();

            $response = (new HtmlRenderer())->parse($data)->toString();

            // This is important; if you want the client to see a correctly rendered output,
            // you need to format it, so the result is an escaped ANSI sequence
            $response = $this->output->getFormatter()->format($response);

            $server->send($fd, $response . PHP_EOL);

            $server->close($fd);
        });

        $server->on('Close', function (Server $server, int $fd) {
            $this->log($server->getClientInfo($fd), false);
        });

        // This will start the TCP server
        $server->start();

        return Command::SUCCESS;
    }

    /**
     * @param array<string>|bool $infos
     */
    private function log(array|bool $infos, bool $connected): void
    {
        if (is_array($infos)) {
            /** @var \Illuminate\Contracts\Support\Renderable $render */
            $render = view('log', [
                'date' => date('Y-m-d'),
                'hour' => date('H:i:s'),
                'client' => $infos['remote_ip'],
                'connected' => $connected,
            ]);

            render($render->render());
        }
    }
}
你可以在这里找到服务器对象上的所有方法。
我想将你注意力引到的一件事是关于接收事件。在本例中,我们将回显客户端发送的任何内容。请随意执行那里的逻辑;例如,在我的情况下,我会根据某些标准验证提交的标志。此外,请注意,要按预期打印输出你您需要在后台获取控制台命令使用的格式化程序,并发送其结果,这是一个 ANSI 序列。通过这种方式,它可以在客户端的终端上正确渲染。
现在,我们可以通过执行以下命令来运行服务器
php securinets serve然后就会获得如下提示
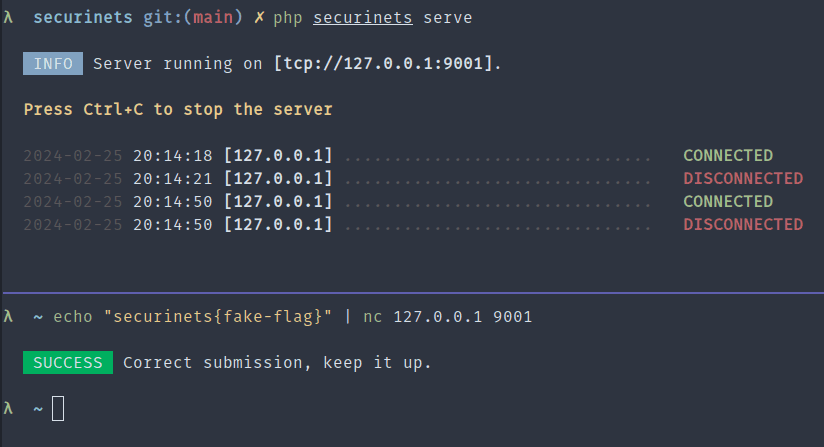
其他
现在我们有了控制台应用程序,我们希望确保此命令始终在运行。出于这样或那样的原因,它可能会崩溃并停止。当这种情况发生时,我们希望能够立即重新启动它。这就是为什么我将使用主管来做这件事。
对于 Linux 用户,可以运行以下命令:
sudo apt update && sudo apt install supervisor现在,创建一个配置文件:
sudo nano /etc/supervisor/conf.d/securinets.conf黏贴如下配置:
[program:securinets]
process_name=%(program_name)s_%(process_num)02d
command=/usr/bin/php8.2 /path/to/console/application/securinets serve
autostart=true
autorestart=true
stopasgroup=true
killasgroup=true
user=always-a-low-privileged-user
numprocs=1
redirect_stderr=true
stdout_logfile=/var/log/securinets.log
stopwaitsecs=3600
运行如下命令开启 Supervisor:
sudo supervisorctl reread
sudo supervisorctl update
sudo supervisorctl start securinets:*
现在,你的 TCP 服务器将运行。例如,如果要运行多个实例,请将 numprocs 设置为 5。在你的应用中,检查端口是否已占用,然后移动到下一个端口。这样,如果你从 8000 端口开始,你将拥有 5 台端口为 8000 到 8004 的 TCP 服务器。
就是这样!为了获得更多乐趣,你可以将 Nginx 设置为反向代理,以添加速率限制。虽然我们不会在这篇文章中讨论它,但文档是你最好的朋友。
结论
Laravel Zero 是一个功能强大的软件包,用于启动控制台应用程序。我们几乎不触及表面,因为它提供了更多。你可以构建交互式菜单、安排任务、发送桌面通知、使用内置 HTTP 客户端使用 API、缓存数据,甚至将应用程序构建为独立的可执行文件。所以,下次你使用此类应用程序时,可以考虑使用 Laravel Zero,它可能正是你想要的! ✨
 上一篇
上一篇 
 QQ 空间
QQ 空间
 QQ 好友
QQ 好友
 微博
微博