Astro 5 的国际化(i18n)指南

国际化 (i18n) 确保 Astro 应用能够无缝支持多种语言。本指南将指导你在 Astro 中配置 i18n、管理翻译文件,以及如何通过动态路由实现语言切换以减少冗余。
第一步:配置 i18n
首先在 astro.config.mjs 中定义你的语言环境(locale)和默认语言。这可以确保 Astro 正确处理本地化路由:
// @ts-check
import { defineConfig } from "astro/config";

// https://astro.build/config
export default defineConfig({
  i18n: {
    locales: ["en", "de"], // Locales you want to support
    defaultLocale: "en", // Default locale (fallback)

    routing: {
      prefixDefaultLocale: true, // Ensures that your default locale is prefixed aswell
    },
  },
});
第二步:定义翻译数据
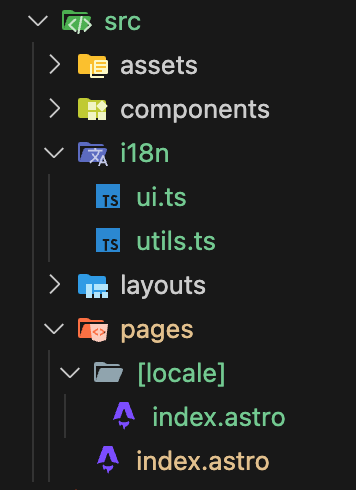
创建一个新目录 src/i18n,使之包含翻译的键名和逻辑。
在新目录中,我们能需要创建两个新文件。首先是 ui.ts,其中包含所支持的语言以及对应的翻译:
export const languages = {
  en: 'English',
  de: 'German',
};

export const defaultLang = 'en';

export const ui = {
  en: {
    'nav.home': 'Home',
    'nav.hello': 'Hello',
    'nav.twitter': 'Twitter',
  },
  de: {
    'nav.home': 'Start',
    'nav.hello': 'Hallo',
  },
} as const;
nav.twitter 并没有专用于德语版的字符串。这种情况下 useTranslations 辅助函数将返回默认语言的值。
第三步:创建 i18n Utility 函数
在第二个文件 utils.ts 中,我们将实现辅助函数用来检测语言并检索翻译内容:
import { ui, defaultLang } from './ui';

export function getLangFromUrl(url: URL) {
  const [, lang] = url.pathname.split('/');
  if (lang in ui) return lang as keyof typeof ui;
  return defaultLang;
}

export function useTranslations(lang: keyof typeof ui) {
  return function t(key: keyof typeof ui[typeof defaultLang]) {
    return key in ui[lang] ? (ui[lang] as any)[key] : ui[defaultLang][key];
  }
}
第四步: R重构页面以实现动态路由
由于 Astro 是基于文件的路由,我们需要确保包含语言环境的 URL 能够与我们的文件结构匹配。要启用本地化路由,请将 index.astro 和现有的 pages 目录移动到新的 [locale] 目录中,以便进行动态路由。同时在 pages 目录中保留一个空的 index.astro 文件,因为 Astro 要求该文件必须存在。
第 5 步:在页面中使用翻译
修改 [locale]/index.astro 以使用翻译 utilities:
---
import Welcome from '../../components/Welcome.astro';
import Layout from '../../layouts/Layout.astro';
import { getLangFromUrl, useTranslations } from '../../i18n/utils';

const lang = getLangFromUrl(Astro.url);
const t = useTranslations(lang);

export async function getStaticPaths() {
  return [
    { params: { locale: 'en' } },
    { params: { locale: 'de' } },
  ];
}
---

<ul>
  <li><a href={`/${lang}/home/`}>{t('nav.home')}</a></li>
  <li><a href={`/${lang}/about/`}>{t('nav.hello')}</a></li>
  <li><a href="https://twitter.com/astrodotbuild">{t('nav.twitter')}</a></li>
</ul>

<Layout>
  <Welcome />
</Layout>
第 6 步:实现语言选择器
新建 src/components/LanguagePicker.astro 以允许用户切换语言:
---
import { languages } from '../i18n/ui';
import { getRouteFromUrl } from '../i18n/utils';

const route = getRouteFromUrl(Astro.url);
---

<ul>
  {Object.entries(languages).map(([lang, label]) => (
    <li>
      <a href={`/${lang}/${route || ''}`}>{label}</a>
    </li>
  ))}
</ul>
小结
使用基于实用程序的方法在 Astro 中设置国际化,可以动态管理翻译和路由。这种方法既灵活,又能保持代码简洁易维护。现在,你的 Astro 应用程序可以无缝支持多种语言!
参考资源:
 上一篇
上一篇 
 QQ 空间
QQ 空间
 QQ 好友
QQ 好友
 微博
微博